Thursday, July 14, 2011

Format Your Memory Card!

Has this ever happened to you  -- you take the memory card out of the camera, pop it into a card reader to download the pictures on your computer, but your computer can't find any images? You know they're there, you can see them displayed in your camera, but the computer refuses to budge. Frustrating, no? If it's ever happened to you, I'm sure you've come up with all sorts of colorful descriptions for this event - probably not printable! But what you have is a corrupted card.

There can be a number of causes for this, not least of which may be a defective memory card. Usually the images can be rescued via image retrieval software, but this can be time consuming. Formatting a card, on the other hand, may prevent the problem in the first place. First of all, it's important to format a brand new card before using it in your digital camera. It sets up the card so that it, and the camera, communicate with each other correctly. And it only takes a few seconds.


Go ahead and pop your brand-new memory card into your camera. From the camera's menu, look for the "format" function (every digital SLR camera will have this function) and hit "ok" or "go" to open it -- the open command itself will vary from camera to camera, so refer to your manual if you're not familiar with this.


You'll see immediately that you also get a "cancel" feature, which lets you opt out of this function. That's important, because formatting will permanently erase all the images you may have on this card if you've already been using it. Not an issue, of course, if the card is brand new, but certainly an important feature to remember. You don't want to accidentally wipe out your images before you've downloaded them.
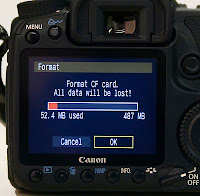
So now you'll go ahead scroll the button from "cancel" over to "ok" and hit the set button to engage the formatting function. This only takes a couple seconds. And there you have it!
To re-cap: always format a new memory card. Personally, I always re-format my card before re-using it as well (instead of just deleting the photos from it) but of course, be sure that those photos have been safely downloaded first.

Do you think this will be helpful? Drop me a line! dhutt@dmddigitalphoto.com

Tuesday, July 5, 2011

I Love Ringflashes ~


The main technical goal of ANY photograph is proper lighting, and in our case -- macro, intraoral imaging -- this can be a little tricky. I work with dentists frequently who are trying to take their photos using all sorts of lighting sources: overhead lamps, window light,  and anything else that seems workable. Needless to say, the results from this approach are always inconsistent and as often as not produce unacceptable results. Perhaps this had been your experience, too.

First, let's talk about the Canon MR-14 Ringflash. This particular flash completes the Canon Digital Rebel SLR camera and Macro lens system. The flash unit itself attaches directly to the front of the lens, and is connected to a control module that sits atop the camera, attached to the hotshoe. It couldn't be easier to use: it's fully automatic, powerful enough to provide excellent exposure even when shooting for maximum depth-of-field, and goes where you point it.

The Nikon ringflash is called the R1 Speedlight, and although it performs the same function, with the same ease and consistency, as the Canon ringflash, it's designed a little differently. A separate ring attaches the flash heads to the lens, but they are a few inches off-axis, and are detachable and can be triggered wirelessly.  Plus, the flash controls are accessed within the camera's menu system instead of a control box placed atop the camera body. It's a very sophisticated and versatile system. The off-axis flash head configuration is perfectly suited for making all intraoral and extraoral images, but is particularly well suited for shade-matching photos which we'll discuss in a later post.

Other excellent, after-market ringflashes than can be used on both Canon and Nikon digital SLR cameras are the Metz Mecablitz 15 MS-1 and the Sigma EM-140 DG TTL.

All these flashes employ what is known as TTL ("through-the-lens") technology. This allows the flash and camera to communicate with each other in a way that ensures a perfect exposure, automatically, when you move closer or further away to frame your shot. This provides consistent, color-balanced exposures, making it possible, for example, to make identically exposed pre-and-post treatment images regardless of the length of time separating beginning and ending shots.

Need a chance to practice with these? Drop me a note & let's schedule some time together:  dhutt@dmddigitalphoto.com