Wednesday, November 23, 2011

Macro Lens = Portrait Lens ~

I had an interesting conversation with a client recently who was wondering why her full-face portrait shots were always a little disappointing.  It wasn't anything dramatic, and was hard to pin-point just what exactly was the problem; they just "never looked right".
But the problem turned out to be a common one: she believed her 100mm Macro lens was usable only for intraoral shots, and nothing else. Her Canon Rebel, as is often the case, came with an 18-55mm general-purpose zoom lens, and she was using this for her portrait shots. This is a good lens for a lot of things, but portraits is not among them. The reason? This zoom lens is very "short" (i.e., wide-angle) and while scenics are great, portraits are distorted, and it was this distortion that caused the images to look disappointing. Let's look closely at this:

This is how a full-face shot will look when you use that zoom lens (or any similar lens that comes with your camera). In this case, the zoom focal length was set on 18mm, its widest setting. Notice how greatly distorted it looks. In fact, to get the face to fully fill the frame, I had to shoot about 2 or 3 inches away from her nose. Obviously un-usable.


For this next one, I set that zoom lens to its 35mm focal length, so I wouldn't have to stand so close to her. It's an improvement, but not by very much. It still looks much too distorted.

When the lens is set at 55mm focal length, its longest, the image starts to look more appealing. Although there is much less  distortion, it's still there.


But here, with the 100mm Macro lens, the portrait looks excellent. There's none of the distortion caused by using the shorter zoom lens. In fact, outside the opertory, this very same Macro lens is an excellent one for many kinds of photographic projects. It's wonderfully sharp and fast. So take it outside and have fun with it. After all, of all the tools you use in your practice, your camera is the only one you can say that about!


Monday, November 7, 2011

Being an Informed Consumer ~

This topic is near and dear to my heart: how to be an informed consumer when shopping for your camera gear, whether in a retail store or website. It's one of the most common subjects of the emails and phone calls I receive. There are so many pro-quality digital camera systems out there, and most salespeople won't really have a clear idea of your dental imaging needs.
There are a couple of big misconceptions about digital cameras that the consumer (& even some salespeople!) can fall prey to: First, the more expensive the camera, the better pictures it takes, and Second (usually related to this), higher mega-pixels = better pictures. Neither of these is inherently true.
So what are the things you'd find on a camera like this $7000 Canon 1Ds Mk III? It's a wonderful camera with the kinds of features needed by the professional shooter: a huge 21 mp sensor for the commercial photographer, a fast 5 frames-per-second burst rate for the sports shooter, a full-frame sensor for the outdoor scenic shooter. Crucial for them, yes, but none of which applies to your imaging needs in the opertory.

What you do need is a light-weight, simple to operate camera that will produce blazingly sharp, color-accurate images every time you shoot. Fortunately, there's a lot of great ones to choose; from Canon, the Digital Rebels: T3, T2i & T3i, ranging from around $550 to $900 for the body. From Nikon: the D3100, D5100, & D90, in the same price range.  Even though moderately priced, they still have very sophisticated sensors ranging from around 12 to 18 mega-pixels. No slouches these!
So, you can put together a complete system -- camera, macro lens, & ringflash -- for a fraction of what just a high-end pro camera body would cost. Read back on some of my earlier posts here about those components. Remember, a quality lens has much more to do with making a superb image than the number of light-gathering pixels on the sensor!
There are excellent photo retailers and reputable on-line suppliers out there; email me if you'd like to know more about some of them. Need some hands-on guidance to learn how best to use them? Let me  know ~ we'll get together!  
                                                   dhutt@dmddigitalphoto.com

Friday, October 21, 2011

Workshop @ Gnathodontics!

One of the most enjoyable aspects of my work is conducting shade-matching workshops at some of the country's best dental labs. Last week we had just such an occasion at Gnathodontics, LTD in Lakewood Colorado. Wonderful facilities and expertly organized; I look forward to working with them in the future. Pictured here are Stephen Mott, CDT,  the lab's co-owner & Implant Dept. Manager on the left, and John Bozis, Customer Relations, Sales & Marketing Mgr in the center. Many thanks also to Carmen Nicholas, Master Ceramist.  This is a really great team.


It was interesting to see some Nikon users at this workshop. The lab itself was using the D90, and there was a D3100 as well. The Nikon camera, coupled with the 105mm f2.8 AF-S VR Macro lens and the R1 Speedlight makes a formidable, but moderately priced, system.
One of my main objectives over the years has been to help dental professionals be informed consumers when it comes to purchasing their digital photography systems. It's common for them to over-buy, that is, end up with a camera that has far more features and capabilities - and thus far more expensive - than actually needed for their intraoral and shade-matching photography. This is why cameras such as the Nikon D90, the D3100, and even the new D5100, are such good choices: excellent image quality and economically priced. There are also great choices from Canon in their Digital Rebel series of cameras.
Are you in the process of purchasing your new camera system? Send me a note if you have any questions. I'd be glad to answer any questions you might have. I've bought a camera or two in my time!  dhutt@dmddigitalphoto.com 


Friday, October 7, 2011

Great Workshops!


This has been a really busy month ~ two workshops here at home in Portland, one more next week in Denver. It was nice, as I rarely get to stay home for these. First, my very biggest thanks to Davis Dental Lab for their work in organizing this workshop and providing some wonderful refreshments that evening. As usual with the dental lab, the focus for the attending dentists was on shade-matching photography.


The first half of this workshop is a really eye-opening discussion on the nature of color itself, and the inherent difficulties involved in color perception. These issues become critical when we try to communicate our perception of color to the dental lab, resulting all too often in costly re-makes. It's amazing, and a little scary, just how fluid our color perception can be, and how so many internal and environmental factors affect us.

The second half illustrates how we use digital photography to address these issues and make it possible for us to communicate color information to the lab much more effectively. Now it's our turn to be amazed at how easily we can make this technology work in simplifying and streamlining the photographic process. The right equipment -- digital SLR camera, macro lens, and ringflash -- are discussed in detail: settings, file formation, monitor calibration, and more. And of course a lot of time to do some real hands-on practicing.


I then presented a workshop on the general use of digital photography to a group of Speech Pathologists in Vancouver Washington.  It was fascinating for me to work with this group of professionals for the first time. They had similar issues of documenting intraoral pre and post-treatment dental procedures related to therapeutic applications. I hope to work more with these practitioners.


Next up: October 14 in Lakewood Colorado, another shade-matching workshop at Gnathodontics, Ltd. I love getting back to Colorado, one of my favorite places any time of year. Click on their link if you'd like to know more about the workshop.

Or drop me a line -- right here at home in Oregon. Also one of my favorite places! dhutt@dmddigitalphoto.com 

Saturday, September 10, 2011

What is "Depth-of-Field"?

We photographers are always throwing around photo-speak terms, figuring that everyone knows what we're talking about. Some of these concepts can be baffling to the non-photographer, but that doesn't minimize their importance. Depth-of-Field is one of these.  In a nut-shell, depth-of-field describes the degree of acceptable sharpness in an image beyond, and in front of, the actual point of focus. An image with deep depth-of-field -- in a landscape, say, or a retracted smile -- looks sharply focused throughout. One with shallow depth-of-field, as in a portrait, will have a sharply defined subject standing out against a soft, blurry background. So it is something we can control and manipulate. With few exceptions, in intraoral photography we want as much depth-of-field as we can, otherwise our pictures end up with a somewhat "out of focus" appearance.
Look at these two diagrams:


Picture your macro lens -- probably it's maximum aperture (f/stop) is f2.8. That's as large as the lens opening can go. Its minimum aperture is f22 or f32; its smallest opening. Notice that when you shoot "wide open" you get very little depth-of-field, an effect even more pronounced with a macro lens. Depth-of-field increases as the size of the lens opening (actually its diaphram) decreases. Let's look at these samples:


Taken at widest opening, f/2.8 with my 100mm Macro

Taken at f8

Taken at f/32

In each case I was focusing on the very same spot, the 6th shade tab. There is practically no depth-of-field at f2.8, so although the tab I focused on is sharp as a tack, the image overall looks out of focus. At f8 we see a good deal more sharpness, but still a lot of fall-off at the extreme front and back. But at f32, the image overall looks acceptably sharp.
When I teach my workshops, I recommend that every shot be made at f32. We let our TTL flash do all the work of giving us correct exposure each time, and so we can be confident that all of our intraoral imaging will look nice and sharp. It's also a lot easier, and less error-prone, than fiddling around changing our lens setting with each shot!

Make sense? Drop me note. A sharp one, please!

Friday, August 19, 2011

Why Can't I Send A Print To My Lab?

Wow ~ it's been a busy month since I last posted, and a lot has been going on. While thinking about a new topic, I came across a couple emails from some of my client dentists asking why their labs were rejecting color prints for shade-matching, or why their percentage of re-makes were so high when they tried to use prints. A color print, quite obviously, is is a poor tool to use to convey color information to a lab.

But why should this be? After all, you have a fine digital camera and a good lens, and even an excellent color printer. The problem is not in your equipment, but in the print itself and the process of making it. Think of the limitations of that color print: for starters, it holds only a fraction of the color information that you saw on your computer monitor. An ink-jet printer, even under the best of circumstances, cannot reproduce the RGB gamut of your monitor. Plus, there is an enormous range of quality in ink-ink jet papers themselves: cheap or expensive, glossy, matte, and so on; and this all greatly affects print quality and consistency.
Now think about the process you go through to make that print. Your eyes are making decisions based upon what they see in an environment that exerts a lot of influence upon those colors. Not surprisingly, none of those conditions exist in the lab where they're trying to make sense of what you sent them. This is a truly complex subject; my most popular workshop is a 4-hour powerpoint lecture & hands-on that deals exclusively with this!

Clearly, your lab needs that color information provided by some other means. Most labs I work with prefer the images be emailed to them as jpg's. Some are requesting the dentist to actually send the CF or SD memory card itself (to be returned & re-used) so that the technician can open those images on a color-calibrated monitor in a tightly controlled color environment. If you're going to email the images, make sure you check with your lab on how they prefer them to be sent. They may have preferences on size and format, which they'll instruct you on.  Ideally you'll include in the image the shade tab and a neutralizing tab, which further help the lab determine accurate color and shading (as in the samples you see here). But make sure you don't try to "tweak" the image before you send it on. Remember, their monitors are calibrated to ICC standards -- yours are not! But more on that in a later post.

Want more info? Send me an email. And you can tweak it all you want!

Thursday, July 14, 2011

Format Your Memory Card!

Has this ever happened to you  -- you take the memory card out of the camera, pop it into a card reader to download the pictures on your computer, but your computer can't find any images? You know they're there, you can see them displayed in your camera, but the computer refuses to budge. Frustrating, no? If it's ever happened to you, I'm sure you've come up with all sorts of colorful descriptions for this event - probably not printable! But what you have is a corrupted card.

There can be a number of causes for this, not least of which may be a defective memory card. Usually the images can be rescued via image retrieval software, but this can be time consuming. Formatting a card, on the other hand, may prevent the problem in the first place. First of all, it's important to format a brand new card before using it in your digital camera. It sets up the card so that it, and the camera, communicate with each other correctly. And it only takes a few seconds.


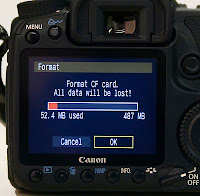
Go ahead and pop your brand-new memory card into your camera. From the camera's menu, look for the "format" function (every digital SLR camera will have this function) and hit "ok" or "go" to open it -- the open command itself will vary from camera to camera, so refer to your manual if you're not familiar with this.


You'll see immediately that you also get a "cancel" feature, which lets you opt out of this function. That's important, because formatting will permanently erase all the images you may have on this card if you've already been using it. Not an issue, of course, if the card is brand new, but certainly an important feature to remember. You don't want to accidentally wipe out your images before you've downloaded them.

So now you'll go ahead scroll the button from "cancel" over to "ok" and hit the set button to engage the formatting function. This only takes a couple seconds. And there you have it!
To re-cap: always format a new memory card. Personally, I always re-format my card before re-using it as well (instead of just deleting the photos from it) but of course, be sure that those photos have been safely downloaded first.

Do you think this will be helpful? Drop me a line! dhutt@dmddigitalphoto.com

Tuesday, July 5, 2011

I Love Ringflashes ~


The main technical goal of ANY photograph is proper lighting, and in our case -- macro, intraoral imaging -- this can be a little tricky. I work with dentists frequently who are trying to take their photos using all sorts of lighting sources: overhead lamps, window light,  and anything else that seems workable. Needless to say, the results from this approach are always inconsistent and as often as not produce unacceptable results. Perhaps this had been your experience, too.

First, let's talk about the Canon MR-14 Ringflash. This particular flash completes the Canon Digital Rebel SLR camera and Macro lens system. The flash unit itself attaches directly to the front of the lens, and is connected to a control module that sits atop the camera, attached to the hotshoe. It couldn't be easier to use: it's fully automatic, powerful enough to provide excellent exposure even when shooting for maximum depth-of-field, and goes where you point it.

The Nikon ringflash is called the R1 Speedlight, and although it performs the same function, with the same ease and consistency, as the Canon ringflash, it's designed a little differently. A separate ring attaches the flash heads to the lens, but they are a few inches off-axis, and are detachable and can be triggered wirelessly.  Plus, the flash controls are accessed within the camera's menu system instead of a control box placed atop the camera body. It's a very sophisticated and versatile system. The off-axis flash head configuration is perfectly suited for making all intraoral and extraoral images, but is particularly well suited for shade-matching photos which we'll discuss in a later post.

Other excellent, after-market ringflashes than can be used on both Canon and Nikon digital SLR cameras are the Metz Mecablitz 15 MS-1 and the Sigma EM-140 DG TTL.

All these flashes employ what is known as TTL ("through-the-lens") technology. This allows the flash and camera to communicate with each other in a way that ensures a perfect exposure, automatically, when you move closer or further away to frame your shot. This provides consistent, color-balanced exposures, making it possible, for example, to make identically exposed pre-and-post treatment images regardless of the length of time separating beginning and ending shots.

Need a chance to practice with these? Drop me a note & let's schedule some time together:  dhutt@dmddigitalphoto.com

Friday, June 24, 2011

A quick look at the cameras ~

It's pretty clear that the only practical way to get successful intraoral images is with a digital SLR camera, using a quality macro lens and a ringflash. This combination provides maximum image quality (color & sharpness, depth-of-field, and so on) that is not obtainable with a "point & shoot" camera.
This does not mean that you're stuck with having to buy an expensive, top-of-the-line camera. Far from it. Both Canon and Nikon produce excellent digital SLR cameras for under $1000: the Rebel XSi or T3i from Canon; the D3100 or D5100 from Nikon, for example. And there are others. I usually recommend Canon to dentists who are unfamiliar with digital photography as I find they're easier to navigate.


One of the great advantages of the digital SLR is the large lens selection. Macro lenses in particular make successful intraoral photography possible. These are amazingly sharp lenses that will provide crystal clear color-accurate images at up to a 1:1 magnification, but are also versatile enough to be great for everything else, too -- including portraits. My recommendation is the slightly longer Macro lenses like the Nikon AF 105 or the Canon EF 100.  Being slightly longer than their 60mm or 50mm counterparts, they provide the same degree of magnification but at a slightly further distance, making it possible to use a ringflash for perfect (and consistent) illumination of the entire intraoral spectrum.

A ringflash makes for a complete photography system.  Since the camera-to-subject distance using a macro lens is usually very short, any source of illumination other than a ringflash won't go where you need it! The ringflash, attached directly on the end of the macro lens, will place the light accurately and evenly on the subject: a close-up of the central anteriors, a tightly focused lateral or quad, or an extremely close shot of the #2 molar. All done simply and automatically, as these devices are all TTL ("through-the-lens") automatic strobes. Great examples of these are the Canon MR-14 Ringflash, Nikon's R1 Speedlight, and others  from Metz and Sigma.

This is just a brief, quick overview. There's so much to talk about, and of course new models of digital SLR's come about regularly. Further posts will concentrate more deeply on particular items.

What have you been using?

Wednesday, June 15, 2011

Welcome!


Hello & welcome to DMD Digital Photo's blog! My hope is that we can provide practical information on the techniques and technology involved in successful intraoral and extraoral photography. And of course, the real attraction of a blog such as this the opportunity to interact with you. I hope you will share your questions, your experiences, and your images.

Over the course of future posts, look forward to discussions on many topics that involve us in dental photography: different kinds of digital cameras, camera settings, shade-matching, macro lenses, ringflashes, file formation, emailing images, computer & printing issues, and much more. I would also encourage you to submit your ideas for discussions as well.

Feel free to post your comments or images here, and you're always welcome to email me directly whenever you'd like:  dhutt@dmddigitalphoto.com

Many thanks, and happy shooting!

DH